This is a tutorial on the creation of a simple Treeview control on an Excel userform. For the purposes of this example, we'll be populating the Treeview control with worksheet names and the addresses of cells with formulas in them.
The article is intended for intermediate level VBA coders, meaning that you should be comfortable with navigating the Visual Basic Editor (VBE), and preferably have created a least a few userforms in your experience. With the exception of Treeview specific items, I will not be covering terminology or explaining things in great detail, so if you're a beginner, you may need some additional help to follow all the steps.
For ease of use, I have just used all the default object names that I've created for the article, but feel free to rename them in your own instance. Just remember to update the code examples to reflect the names of any controls that you do this for.
Creating the underlying structure:
To follow along with the example:
- Create a fresh new workbook
- Add a few formulas to worksheets 1 and 2. (It doesn't matter what they are, just something that is a formula)
- Enter the VBE
- Add a new userform to your workbook (we'll come back to this)
- Add a new blank code module, and place the following code in it (which will be used to launch the userform):
Sub ufLaunch()
     'Launch the userform
     UserForm1.Show
End Sub
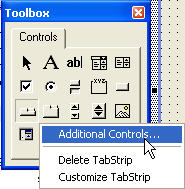
Add the Treeview control to your controls toolbox:
- Right click the Toolbox and choose "Additional Controls" (as shown below)
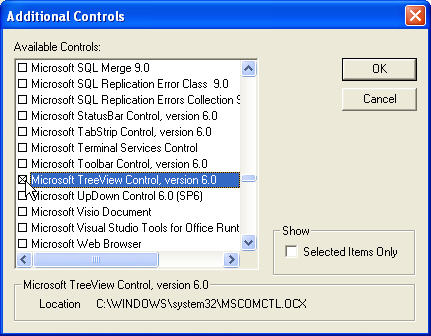
- Scroll down the list until you find the "Microsoft Treeview Control, version x.x" (Mine was version 6.0, but yours may be different)
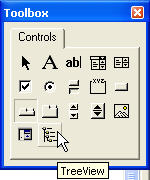
- You should now have a Treeview control on your toolbox:
NOTE: The Treeview control will stay on your toolbox until you remove it
Set up the userform:
- Right click the add the following controls:
- TreeView
- Label
- CommandButton
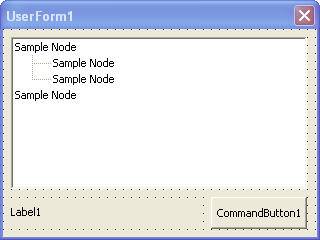
Your userform should now look approximately like this:
Add the code to make things work:
Each of the following routines will go in the userform module, and will be discussed at the end.
Private Sub UserForm_Initialize()
'Author : Ken Puls (https://www.excelguru.ca)
'Purpose: Load userform with desired defaults
     'Set control defaults
     With Me
          .CommandButton1.Caption = "Close"
          .Label1 = vbNullString
          .TreeView1.LineStyle = tvwRootLines
     End With
     'Populate the Treeview
     Call TreeView_Populate
End Sub

Private Sub TreeView_Populate()
'Author : Ken Puls (https://www.excelguru.ca)
'Purpose: Populate the treeview control
     Dim ws As Worksheet
     Dim rngFormula As Range
     Dim rngFormulas As Range

     With Me.TreeView1.Nodes
          'Clear TreeView control
          .Clear

          For Each ws In ActiveWorkbook.Worksheets
               'Add worksheet nodes
               .Add Key:=ws.Name, Text:=ws.Name

               'Check if any formulas in worksheet
               On Error Resume Next
               Set rngFormulas = ws.Cells.SpecialCells(xlCellTypeFormulas)
               On Error GoTo 0

               'Add formula cells
               If Not rngFormulas Is Nothing Then
                    For Each rngFormula In rngFormulas
                         .Add relative:=ws.Name, _
                              relationship:=tvwChild, _
                              Key:=ws.Name & "," & rngFormula.Address, _
                              Text:="Range " & rngFormula.Address
                    Next rngFormula
               End If

               'Release the range for next iteration
               Set rngFormulas = Nothing
          Next ws
     End With
End Sub

Private Sub Treeview1_NodeClick(ByVal Node As MSComctlLib.Node)
'Author : Ken Puls (https://www.excelguru.ca)
'Purpose: Write the selected node to a label for later use
     Me.Label1.Caption = Node.Key
End Sub

Private Sub CommandButton1_Click()
'Author : Ken Puls (https://www.excelguru.ca)
'Purpose: Unload the userform
     Unload Me
End Sub
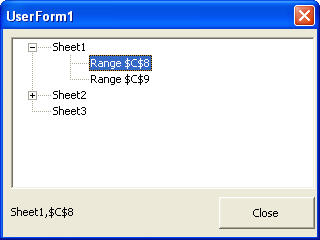
The end result:
Save the project and go back to the Excel interface. Press Alt+F8 and run the "ufLaunch" macro to display the userform. As long as you put some formulas in your worksheets, those sheets should have a little + sign beside them, so click to expand them. Click on the Sheet names or the range names, and watch the label in the bottom left of the userform show what node you've selected. A screenshot of the finished form is shown below:
The code explained:
The userform makes use of four routines, which are broken down as follows:
Private Sub UserForm_Initialize()
The purpose of this routine is to set the desired defaults on the userform when it's loaded. While I would normally set the default values of my controls in design view, I chose to go this route to allow an explanation with just the drag and drop of standard controls. This routine sets each controls defaults, then calls the Treeview_Populate routine to fill the treeview control.
While there isn't much mystery in the above, there is one line in this routine worth nothing, and that is the one that sets the Treeview's LineStyle property to 'tvwRootLines'. This property is be default set to 'tvwTreeLines' when you drop the control on the userform. In that state, however, we do not get the +/- indicators, which means that you have to double click a node to get it to expand or collapse. Personally, I find the +/- view much more intuitive, as the user does not need to double click the node to know if there is anything in it. (They can still double click to expand or collapse the node if they want to though.)
Private Sub TreeView_Populate()
This routine actually populates all the nodes of the Treeview; in this case with the name of each worksheet in the workbook and the ranges that contain a formula.
The clearing of the control and looping through sheets and ranges should be self explanatory, so I won't explore them in detail, but I do want to look at the method to add Treeview nodes.
When adding nodes to the Treeview, we need to create a parent/child relationship. In this scenario, each Sheet is a parent, and the ranges are the children that are spawned from the parents. (You could take this to a further level, by making the actual formula, value and fonts children of the ranges as well if you chose. In that case, the range would be the child of the sheet, but the parent of the other data under it.)
To add a top level parent node, we need to assign both a Key and some Text to the node. The key must be unique, and the text is what shows up in the Treeview on the userform. In the example above, the worksheets are added to the treeview using the following code:
.Add Key:=ws.Name, Text:=ws.Name
i.e. Me.TreeView1.Nodes.Add Key:="Sheet1", Text:="Sheet1"
Every time you want to add a top level node to the userform (Sheet1, Sheet2 and Sheet3 in the example), you'd use the coding construct above.
To add child nodes, the procedure is slightly different. We still use the add method, and we still need a unique key, but we also have to provide the key of the parent node (relative) and the relationship (tvwChild). In the example, the code to add the children nodes (edited for line breaks) looks like this:
.Add relative:=ws.Name, relationship:=tvwChild, _
Key:=ws.Name & "," & rngFormula.Address, Text:="Range " & rngFormula.Address
i.e. Me.TreeView1.Nodes.Add relative:= "Sheet1", relationship:=tvwChild Key:="Sheet1,$C$8", Text:="Rage $C$8"
So to link the child node under the parent node, the 'relative' must be set equal to the parent node's 'key', and the relationship must be set to 'tvwchild'. To make the child node valid, it must also have it's own key that is unique from any other in the treeview (not just the other children). What I did here was set up a compound key that is made up of the parent's key and the current range, separated by a comma. Why? In a project I built with three parent/child layers (Sheet,Range,Data), I was easily able to split it up and see do what I wanted. For example, if I wanted to activate the selected range, I split the label's contents into an array, use the individual components to activate the range i want. An example of this is shown in the Supplementary Information section at the end of the article.
Private Sub Treeview1_NodeClick(ByVal Node As MSComctlLib.Node)
The purpose of this routine is to capture the treeview node's click event and write the key of the clicked node to our label for later use. I set the label1 control to 'vbNullstring' when the form was loaded, to ensure that the label is blank if no control is selected.
Private Sub CommandButton1_Click()
This command button simply unloads the userform.
Conclusion:
Once understood, the Treeview control is actually quite easy to set up and use. While this example has focussed on using the treeview control in an Excel userform, it could just as easily be applied in an Access, Word or Powerpoint solution, or any other application that supports the use of VBA. (In fact, this control can actually be accessed from other languages as well.)
Supplementary Information
Adding images to the Treeview:
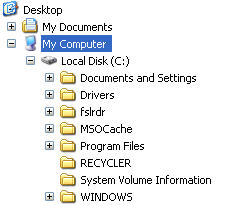
The treeview control is used in a great many places in Microsoft Windows, and many times has images associated with it. Just one example of this is the capture below from the windows explorer:
Like the picture above, you can add images to your treeview control, and my friend Colo had a great page on doing that. While his site is no longer online, the page can still be access via the Google Wayback machine at this link.
Using the Treeview form to go to the selected range:
The following routine would add additional functionality to our example, by taking the user to the selected worksheet or range. It also goes in the userform module of our example, but you will need to add a new button to trigger it:
Private Sub CommandButton2_Click()
'Author : Ken Puls (https://www.excelguru.ca)
'Purpose: Go to the selected node
     Dim sNodes() As String

     'Check if a node has been selected
     If Me.lblNode.Caption = vbNullString Then
          MsgBox "You have not selected anything!" & vbNewLine & _
                 "Please select something and try again.", vbCritical + vbOKOnly, _
                 "Nothing selected"
          Exit Sub
     End If

     'Split label into portions
     sNodes = Split(Me.lblNode, ",")

     With Worksheets(sNodes(0))
          'Activate the worksheet
          .Activate

          'Activate the appropriate range
          If UBound(sNodes) + 1 > 1 Then
               'Activate selected range
               .Range(sNodes(1)).Activate
          Else
               'Worksheet selected, activate "A1"
               .Range("A1").Activate
          End If
     End With

     'Unload the userform
     Unload Me
End Sub
Syndication:
This article has also been published at Professional Office Developers Association (no longer online).
2 thoughts on “Using a Treeview Control”
Can this control bind nodes to excel lines in a sheet? I want to display a multi-level Bill of material. On the node lines I want to display data and perform calculations and roll-up values at different levels of the tree. Thanks!
Hi Britt,
Yes, you absolutely could, you'd just need to loop through the array building the nodes and child nodes based on your outline. For what it's worth, I usually tend to set up a separate function called AddChildNodes (passing in the parent and child nodes) which calls itself for any additional child levels. If you need help setting that up, I would suggest posting in the Excelguru Programming help forum.