Introduction:
This article covers the basics of using Form Controls in an Excel worksheet, and originated from one of my blog posts, which can be found here.
While I don't tend to use Form Controls a great deal, they are certainly one of the Excel features I'm glad are in the toolbox. The main reasons I'll use one of the Form Controls are:
- They give an obvious visual style to your worksheet
- They can be used to force users to choose one of your provided options (Pro-active data validation)
Now, I said I don't use them a lot... why? To be honest, it comes down to one main thing... I don't like that you have to take your hand off the keyboard to grab them and use them. To me, one of the big strengths of a well-built worksheet for data entry is the ability to keyboard it all. For this reason, I'll often use a Data Validation in-cell drop-down list for pre-defined choices, instead of a Form Combo Box or List Box. Still, you can't beat the glamor of an Option Button set on occasion. It just really comes down to what is right for your spreadsheet at the time.
ActiveX vs Forms controls?
Excel actually has two sets of controls available to put on a worksheet. ActiveX controls, which are available from the Control Toolbox, and Form Controls.
ActiveX controls are pretty robust, allowing you to change many of their properties, such as their backgrounds. They also have a variety of built in macro events that are linked specifically to the objects. They do have their drawbacks, however. If you don’t know VBA, you may have a much harder time working with them, as you need to write code to do things with them.
By contrast, Form Controls are much more simple. They have built in methods to easily place values in worksheet cells with no programming needed. Unfortunately, you can’t manipulate the display of them much at all. Having said that, they can be quite simple to use, and can help in forcing your users to choose amongst the options you give them.
The remainder of this article will focus on how to set up and use the Form Controls that I use most often; Group Box, Option Buttons, List Boxes, Check Boxes, Combo Boxes, Spin Buttons and Buttons.
Where do you find the Form controls?
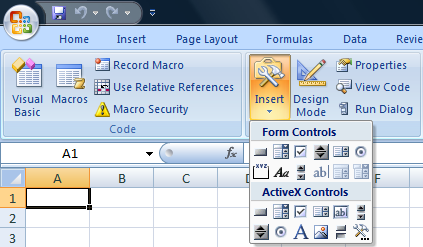
If you are using Office 2007, both the ActiveX and Forms controls are located in the Controls group on the Developer tab. Click “Insert” there, and you’ll get the list shown below:
NOTE: If you don't see the Developer Tab in the Ribbon:
- Excel 2007: Go to the Office button, choose Excel Options, and check the "Show Developer Tab in the Ribbon" checkbox on the Popular tab.
- Excel 2010: File-->Options-->Customize Ribbon, and check the checkbox next to the Developer Tab on the right
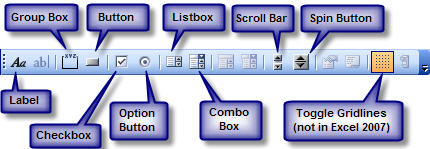
For earlier versions of Excel, you’ll find the Forms Toolbar by going to View|Toolbars|Forms. While the controls are identical between Excel 2007 and earlier versions, the picture below shows an annotated view of Excel 2003's Forms Toolbar:
Forcing user to choose from a list
One of the great things you can do with these controls is to force a user to choose a value from a list. We’ll illustrate this by creating one to begin with. Go to a blank sheet in your workbook and enter the following list of colours. (Or colors if you happen to be one of my US friends.  )
)
- Red
- Orange
- Yellow
- Green
- Blue
- Purple
Now, highlight the list, and name it rngColours.
If you don’t know how to do this easily, go to Insert|Name|Define (or Formulas|Defined Names|Define Name if you’re using Excel 2007 or higher.) Type “rngColours” in the Name box, and make sure that the cells that contain your list are in the “RefersTo” box.
We’re now ready to use one of the Form controls on our sheet.
Combo Box and List Box
Combo boxes and list boxes are virtually identical in use, but vary in their presentation. While the list box shows all items in the list, combo boxes keep only one line until you click the arrow to expand them. For this example, we’ll use a combo box. Personally, I find these to be one of the most appealing of the controls, as they have a small footprint but still contain the list of data. So move to a new sheet (let’s keep it separate from our data), and draw a Combo Box on your worksheet:
- Click the Combo Box on the Forms toolbar
- Starting at the upper left of cell A3, left click and drag your mouse to cover to the bottom right of B3
Notice that the Combo Box always drops lower than the bottom of the current row. I don’t know why this is, but the minimum height of a combo box is 15.75, where the default row height is 12.75.
At any rate, let’s right click the control, and choose “Format Control”. The true power of this control is all on the “Control” tab, so let’s navigate there.
In the “Input Range” field, fill in “rngColours” (or whatever you called the range). You could also refer to the range using Excel’s standard A1 format if you like.
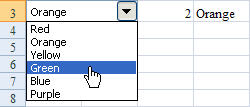
The “Cell Link” is the big key here. This is the cell that the selected value will drop in to when we select something. Let’s make this C3 for now, and then click OK.
Click somewhere on the sheet to get out of design mode (the little circles surrounding the control will go away), and then left click it. You should notice that it gives you a drop-down list with all the colours. Select one.
Now, in cell C3, you should see a number. This is the number of the item from the list. Great, you say, but that’s not what I chose… how do I get the actual colour?
This is actually part of the power of the forms controls. You get the index number of what was chosen, which allows you to look up things in tables. Let’s enter the following in cell D3: =Index(rngColours,C3)
Go and change the combobox values a few times. You should see that your colours keep updating.
So why is this Index return so great? Assume that our data table had many more columns to it. We can use that value to look up the appropriate values in other columns as well, simply by adjusting our formula. Assume we added another column to our data table that held something important. We could return that value in the next column over by adjusting our formula to =Index(rngColours,C3,2). Please note that if you have a multi-column range, you’d return the values in the first column by way of =Index(rngColours,C3,1)
Tip: Put the value of the combo box in cell A3, to hide it behind the control, or place it in a hidden range to keep it out of the users’ view.
Group Box and Option Buttons
The Group Box is a control that is specifically used to keep Option Buttons together and have them work as a group. To illustrate this, let’s go to a new sheet, and add a nice big Group Box:
- Click the Group Box on the Forms toolbar
- Starting at the upper left of cell A3, left click and drag your mouse to cover to the bottom right of D16
Now, add six Option Buttons to the group:
- Click Option Button and draw it within the Group Box, starting upper left of B4 to lower right of C4
- Do this 5 more times, on rows 6, 8, 10, 12 and 14
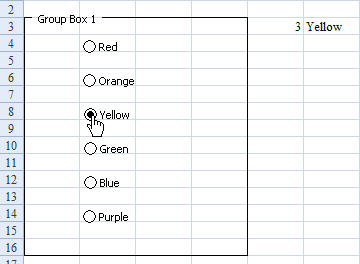
- Change the names, from top to bottom, to Red, Orange, Yellow, Green, Blue, Purple
Yes, this was a little painful and tedious, but it gives us a way to present our users with choices. What we want to do now is figure out what choice they made, so right click one of the Option Buttons and choose “Format Control”. If you are not already on the Control tab, select it and notice that you can “Uncheck” the option button should you need to. In addition, we have the option to set a Cell Link here, so let’s set that to E3 and say OK.
Before we move on, let’s set up the formula to return the chosen colour. In F3, enter the formula =Index(rngColours,E3).
Now, try selecting on of the option buttons. You should see the colour you’ve chosen show up in F3. I should point out that this has nothing to do with the names you assigned to the buttons, and everything to do with the value you chose. This is why we made sure we named the buttons from top to bottom in the order our list was set.
A couple of additional points of interest here:
- Only one Option Button within the frame can be selected at a time. If you add a button outside the frame, however, it could be selected as well as one from within the frame. Likewise if you have multiple frames… one in each.
- Only one cell link needed to be set up. This setting affects all option buttons within the frame.
Spin Button
The spin button is a bit different from the afore-mentioned controls. Create a new sheet again, and drop a spin button control on your worksheet. (You can choose where.)
Right click it and have a look at the following screen (captured from Excel 2007):
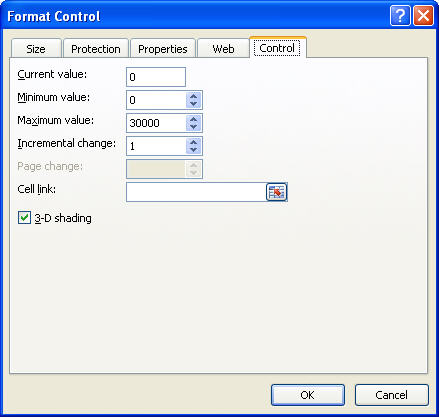
So what is all this?
- Current Value tells you what the value of the spin box is currently set to. Since we’ve just created it, it’s zero
- Minimum value is as low as the spin button can go. You cannot set a value below zero, but you can set it higher. Let’s set it to 1.
- Maximum value is whatever you choose. In this case, we’ll set it to 6.
- Incremental change is how much you want the spin button to change by each time you click the button. We’re going to leave this at 1.
- Cell link, as you might expect, is where you want the value outputted to. Choose B3.
Note: All numbers here must be whole numbers. No decimals.
If you’ve been following along with this post, you’ve probably guessed that the formula in C3 is =Index(rngColours,B3). Click up or down on the spin button, and you should see the values change:

You may recall that at the beginning of this post I mentioned that I used some form controls in my Net Present Value calculation. It was this control that I used so that I could spin the IRR and Interest rates. (One for each.) I also mentioned that you couldn’t put decimals in the spin button box, so here’s how I did it:
The values I had in the spin button configuration were:
- Minimum: 0
- Maximum: 1000
- Incremental: 1
I then dumped the value into a cell, (B1 pictured below), and put the following formula in cell C1: =ROUND(B1/1000,3). Finally, I formatted it with a % format, and allowed an additional decimal place to be displayed. I ended up with:

Checkbox
The checkbox is similar to an Option Button, except that you do not need to place it inside a Group Box. In addition, each checkbox can be selected individually from all others, meaning that you can have one, some, all or no checkboxes in your worksheet checked. The cell link, accessed the same was as the controls above, places only a TRUE/FALSE value in the cell.
Button
The button control is the most simple of all. It pretty much just acts as a very simple macro launcher. As soon as you add it to a worksheet, it will ask you which macro you wish to run.
Conclusion
While I haven’t covered them all, hopefully this has given you enough information to use the most common of Excel’s built in Form controls. They can be a great addition to help you control your users actions in your worksheets and, combined with worksheet level security, are one way to encourage your users to make valid data selections. Properly set up, they can also add a certain flair or “bling” to your worksheets as well.